You have just created a new website with WordPress and now you are confused about what to do after installing WordPress. This tutorial is for you!
Most people think that after installing a WordPress site, it’s time to start creating content or adding products and get on with the WordPress journey. That’s not the case. You have to learn how to customize your WordPress site and make it live for users and search engines.
We have made a list of things you should do after creating a WordPress site. Here they are-
- Write Your Site Title with a Tagline
- Choose Your Preferred Timezone & Language
- Install a WordPress Theme & Customize It
- Add Your Logo & Favicon
- Customize the Permalink Structure
- Configure Navigation Menu
- Remove the Dummy WordPress Contents
- Configure SEO
- Connect Google Analytics & Search Console
- Install the Essential Plugins for Your Website
- Personalize Your User Profile
- Publish Your First Blog
Let’s dive into details.
1. Add Your Site Title with Your Chosen Tagline (Make Sure it’s Catchy)
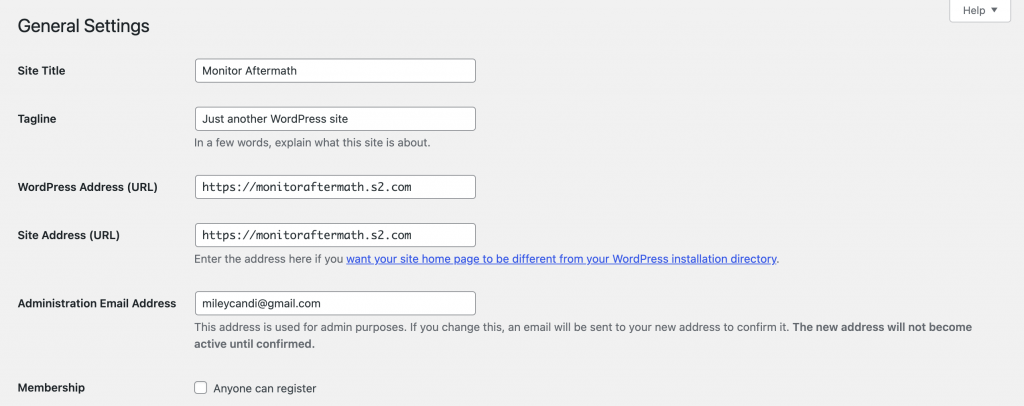
First, you need to add your site title. The site title usually reflects your brand name. And add a catchy tagline as well. Make sure the tagline isn’t really long and is catchy.
To do that go to Settings> General and there you will find the fields for Site Title and Tagline. You have to click on the Save Changes button after finishing writing your title and tagline.
2. Choose Your Timezone & Preferred Language
This is a very important part of customizing your WordPress site. Because your selected time zone will help you keep track of your scheduled posts.
In order to set up a timezone go to Settings-> General. Hit the dropdown menu beside Timezone.

You can also choose the language you want to see on your whole website from here.
3. Install a WordPress Theme & Customize It Per Your Requirements
Every year WordPress releases a new theme with a different outlook. You can either install that official theme or there are thousands of themes available in the WordPress repository. You can choose different types of themes as your business type.
There are two ways to install a WordPress theme-
- Visit Appearance>Themes> Add New, there type the name of the theme you are looking for.
- Or search for your favorite theme and download its .zip file from WordPress.org. Then you have to upload the theme to your website.

As all the themes are customizable, you can customize the theme by visiting Appearance> Customize.
4. Add Your Website Logo & Favicon
A logo is the identity of your brand. So make sure you design a logo according to your business type. If you are an expert designer, then you can design the logo yourself. Or you can hire a professional designer to design one.
After that, you need to create a small version of the logo, known as Favicon. That’s what appears in the search results.
Navigate to Appearance> Customize> Site Identity, then choose your logo and site icon from your computer.
Note: Site Icons should be square and at least 512 × 512 pixels.
5. Customize the Permalink Structure
Permalinks are representative of your website’s content. They tell search engines what your posts and pages are about. That is why their structure and format should be finalized from the get-go and they should be well thought out.
In order to configure the permalink structure go to Settings> Permalinks. Then choose the structure you prefer for your website. It is better to use a Post name or custom structure as per your needs. Don’t forget to save the changes after configuring the URL structure.

6. Set Up the Navigation Menu
The navigation menu is important for every website as it helps every user to navigate through your website. So next in the What to do after installing WordPress guide, you need to set up the navigation menu.
Normally, this menu has links to your core pages. You can use sub-menu items from the drop-down.
To set up your menu, go to Appearance → Menus and create a new menu:

After creating a menu, you need to select the pages you want to add to the menu.
7. Remove All the Dummy Contents, Plugin, Themes
WordPress creates a few pages, one post, and one comment just after the installation automatically. But you have to delete these to keep your website clean. If you have any plugins or themes that you don’t need, delete them too.
In order to delete the dummy contents, plugins, theme,
- Posts > All Posts to delete all dummy posts on your website.
- Pages > All Pages to delete dummy pages.
- Appearance > Themes to delete dummy themes.
- Plugins > Installed Plugins to delete dummy plugins.
8. Configure SEO
SEO is an important part of any website. If you get your SEO tactics right it will help your website get search engine visibility and drive traffic to the site. And fortunately, WordPress has many SEO plugins that will help you.
Yoast SEO is one of the most effective WordPress SEO plugins. There are more plugins like Rank Math and All in One SEO.
Go to Plugins > Add New, and type your preferred SEO plugin on the search bar. Then install and activate the plugin.

9. Connect Google Analytics & Search Console
You need to know how your audience is interacting with your site, what they are looking for, and how you can help them find it. These data will help you take smart decisions to grow your site.
For that, you need to connect Google Analytics and Search Console with your WordPress website.
To make your work easier you can use the Google Site Kit plugin. Activate the Google Site Kit plugin from the WordPress dashboard.
Next, sign in to your linked Google account. It will connect Google Analytics with your website. Then connect the Site Kit plugin with your Search Console as well.

From that point onward, you’ll have the option to see the impressions and different information connected with traffic, content, and speed from the Site Kit Dashboard.
10. Install the Necessary Plugins for Your Website
In order to add some basic and advanced functionalities, you need to install some essential plugins. Here’s a list of the essential plugins for WordPress you need for an optimal WordPress site.
- Akismet: An anti-spam plugin to block spam comments that contain malicious links.
- WPForms: A simple WordPress form builder to create contact forms.
- WP Super Cache: It quickly manages to cache and improves the website speed.
- UpdraftPlus: It is one of the best plugins for WordPress site backup.
- Sucuri: A security plugin with malware scans and brute force protection.
11. Personalize Your User Profile
From the Users>Profile section of the admin panel, you can add your personal information. You can also add more information like Email, Website, and Biographical Info of the author from here.
Add a Profile Picture to establish an identity for your name on the internet.

12. Publish Your First Blog
You are done. Congratulations, that was a hectic journey. Now it is time to publish your first content and get your journey started.
In order to publish your content, you need to create a post. Go to Posts→ Add New. Give your post a title, and add your content. Don’t forget to add the keyword, meta description, etc.
In other words, write the content very carefully and edit with a knife. After you are done, hit the publish button.
Congrats again, you are a proud owner of a WordPress website. And this is How to Customize Your WordPress Site for search engines and people.
FAQs on How to Customize Your WordPress Site
What happens when you install a WordPress theme?
Ans: Once your theme is installed, you will see a ‘Theme installed successfully message. You’ll also see links to preview or activate your theme.
Is it possible to use WordPress without a theme?
Ans: No, it is not possible to use WordPress without a theme.
Is WordPress only for blogging?
WordPress is very well known for its ability to craft highly engaging blogging websites. However, thanks to the thousands of plugins and themes, It can be sculpted into any type.
Which browser is best for WordPress?
With such a high market share, Chrome assures that it provides better functionality and features for developers. And, WordPress is no exception here.
How to Customize Your WordPress Site: Final Recap
Here is what to do after installing WordPress, all at a glance
- Write Your Site Title with a Tagline
- Choose Your Preferred Timezone & Language
- Install a WordPress Theme & Customize It
- Add Your Logo & Favicon
- Customize the Permalink Structure
- Configure Navigation Menu
- Remove the Dummy WordPress Contents
- Configure SEO
- Connect Google Analytics & Search Console
- Install the Essential Plugins for Your Website
- Personalize Your User Profile
- Publish Your First Blog
Hopefully, you won’t have any confusion about what to do after installing WordPress after reading our guide.
It may look complicated at first, but if you follow the right guide and do the steps correctly, then you won’t have any problems creating your WordPress site. You won’t need to hire any professional to customize your WordPress site.
And if you get into trouble, do let us know in the comment section.