Looking to learn how to create a self-hosted WordPress site from scratch?
Starting a website from scratch is not easy, especially if you are from a non-technical background. But with the right resources, you can create a self-hosted site within a hour.
WordPress is the top CMS platform with a 43% market share, which makes creating a website easy.
However, people are still struggling with questions like-
-Where to start?
-What tools to use?
-What guide to follow?
With that in mind, we have created this detailed guide where we went through all the steps of creating a WordPress site.
Here is a quick overview of the steps to create a WordPress site from scratch and give it a go-
- Register a Domain Name
- Choose the Best WordPress Hosting
- Install WordPress from cPanel
- Configure WordPress General Settings
- Add Necessary Web Pages
- Configure Permalink Structure
- Create a Sitemap and Submit to Google Search Console
- Publish Your First Content
In the end, we have discussed some bonus parts on installing a plugin and theme.
Let’s get started.
How to Start a Self-Hosted WordPress Site From Scratch: Step by Step Guide
For most users, a self-hosted WordPress.org site is the perfect solution to create their website. Because it comes with thousands of add-ons and designs that allow them to create any kind of website they think of.
“Self-hosted websites are hosted on the hosting web service of your choice”.
There are a number of reasons why WordPress.org is more reliable for users-
- 100% open source
- Highly customizable
- Easy to customize with themes & plugins
- SEO friendly
- Safe & secured.
Now you know the reasons behind people choosing WordPress to create their websites, let’s get to the good part.
Step 1: Register a Domain Name
Your domain has to be very catchy. Because it is the first piece of content on your website your users will interact with. That is why you have to be very careful while choosing your domain name.
Here are some tips to choose the perfect domain name-
- Make it short and memorable
- Choose the name close to your industry
- Don’t use hyphens or special characters
- Don’t use numbers or signs
- Choose a name that represents your business.
There are many domain name service providers available to help you get your domain name registered with ease. Including,
- Bluehost
- Domain.com
Before purchasing and registering your domain name, don’t forget to search on Google to see if the name already exists.
Step 2: Choose a WordPress Hosting
After choosing and registering your domain name, it is time to choose a hosting plan for WordPress. Hosting is the place where you will store all your website’s data. It is the warehouse where you will store all your goods.
There are many hosting services that specialize in WordPress. Here are some top-managed WordPress hosting providers,
Choose any of them as they are all popular WordPress hosting providers.
Step 3: Install WordPress from cPanel
You are done with Domain and Hosting. Now it is time to install WordPress. You need to log in to your cPanel account and install WordPress from there.
“cPanel is a web hosting control panel that hosts various services like email, database, backup, FTP Accounts, and securities. Once you successfully install WordPress on it, you become able to create and customize your websites as you want.”.
Although most web hosting companies offer 1-click WordPress installation, we will walk you through the manual installation process so that you don’t face any issues if you use other hosting providers as well.
Log Into Your cPanel
If you have a domain, you can go to cPanel from there. However, these methods are quite complicated for many users. Below is an easy formula to find your cPanel page.
Type the address: https://www.(domain-name).com/cPanel on your browser. Then click the Enter button.
You will get the cPanel page. Just type your username and password that the hosting provider sent you through email or else. Using the log into your cPanel dashboard.

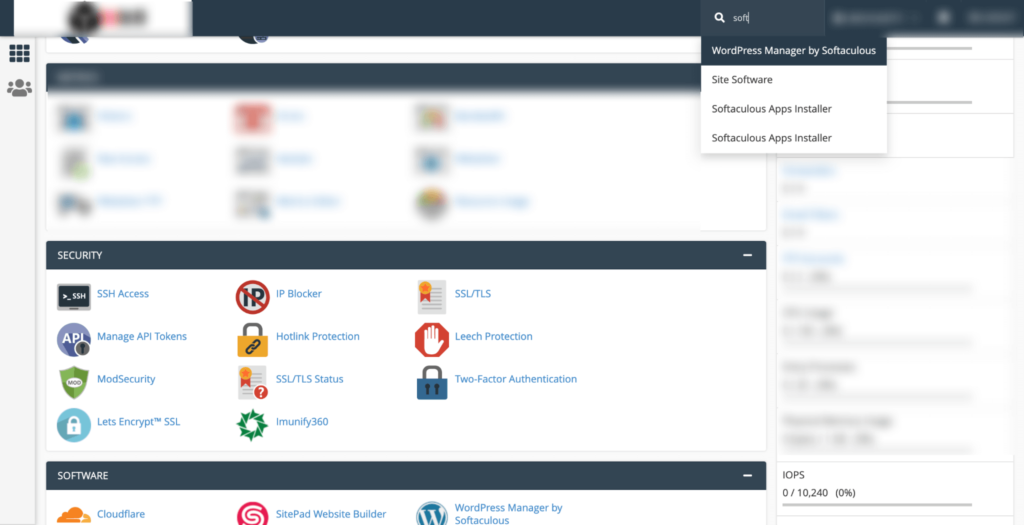
Your cPanel interface may look like the photo below.

Find the Softaculous App Installer
You will see a search bar on top of the cPanel. Type ‘Softaculous’ there. It will automatically show you the apps under the Scripts section that this installer app supports. You will get WordPress under this section. Click on it.
Select Your Domain Name and Protocol
The last click will take you to the WordPress setup page. Click on the Install button. It will extend the page.
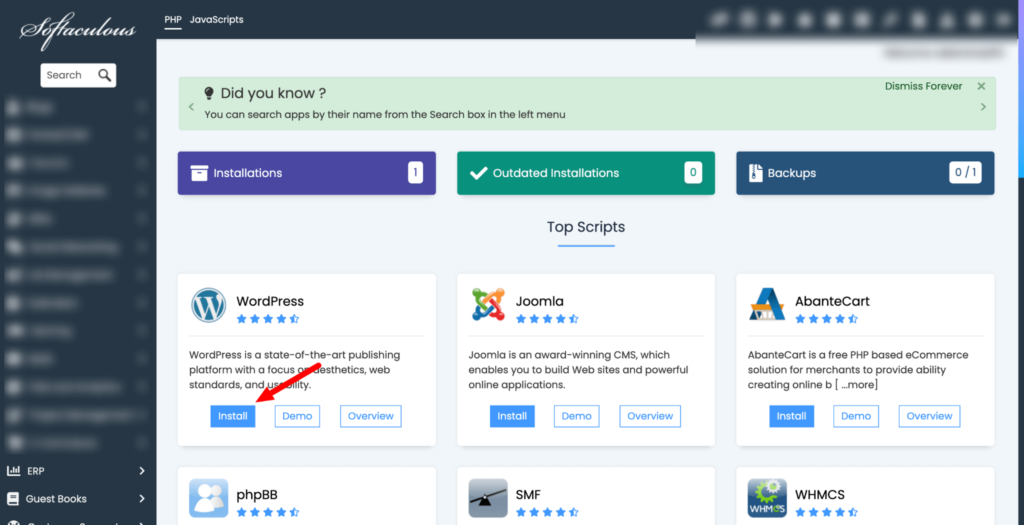
Scroll a bit down. You will come to the Software Setup portion.
Choose your preferred protocol. If you have the SSL certificate enabled, you can choose ‘https://www’. Otherwise, you should use ‘http://www’. After that select your domain and keep the Directory option blank.

Enter Site Settings and Admin Information
You will see the portion of Site Settings and Admin Account.
If it’s a blogging site, you can name it My Blog. If it’s an eCommerce site, you can put the store name here. Next, give a short description of your website. Once you are done with Site Settings, come to the Admin Account section.

Create a unique admin username and passwords that become difficult for cybercriminals to track. Set an admin email address at the end.
Select Language and Plugin
You will see the language and plugin(s) options. Choose your preferred language from the left side. Next, select any of the recommended plugins from the right side. But it’s not mandatory. You can do it later on.

You have successfully installed WordPress on your site.
Step 4: Configure WordPress General Settings
Now that you have installed WordPress, you need to configure the basic settings of WordPress. Login to your WordPress dashboard by using the username and password you have set. Navigate to Settings→ General.
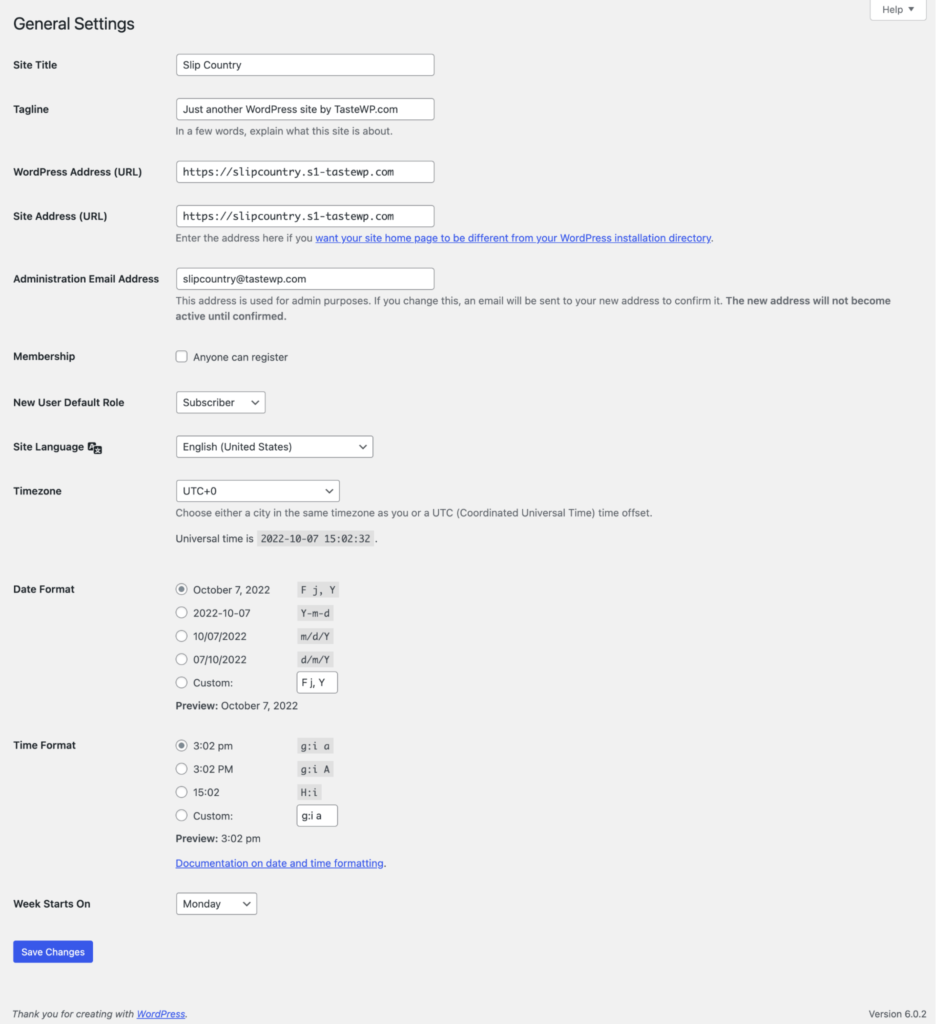
There you will need to-
- Add your site title
- Enter the tagline
- Edit your site’s URL
- Add email address
- Check mark to open registration for all
- Configure user role
- Select timezone
- Select date format, etc.
And in the Writing section, configure the default post category, post format, etc. Whereas in the Reading section you can choose your Homepage (either a static page or your latest posts), blog posts per page, post summary, and search engine visibility.
Note: We recommend you disable the search engine option at the initial stage without completing the site’s customization. Once you’re done with the customization and configuring, you can happily enable this option and submit your site to search engines.
Step 5: Add the Necessary Web Pages & Navigation Menu
Next in the how to create a self-hosted WordPress site from scratch, you need to create the necessary pages for your WordPress site other than your homepage.
Along with that, you need to create a navigation Menu as well.
The necessary pages include-
- Homepage
- About us page
- Contact us Page
- Privacy policy page
- Terms of Services page
- Products page (if you offer pages)
- Blog page
- Service page, etc.
Now, there are many page builder plugins available in the WordPress repository that will help you design these pages as you want.
But normally to publish a page, go to Pages→ Add New. Give your page a title and add the necessary content. Then hit the publish button to publish the page.
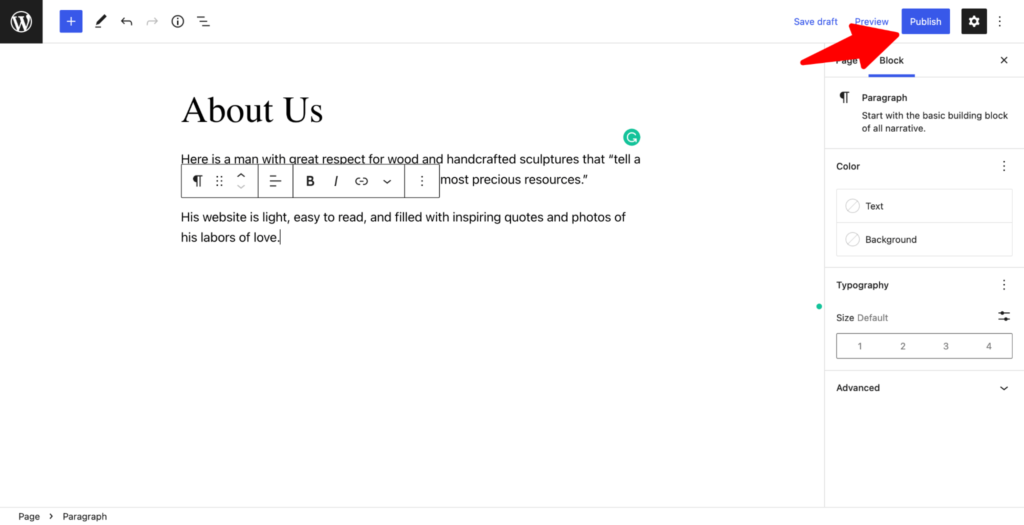
The same goes for the other pages as well.
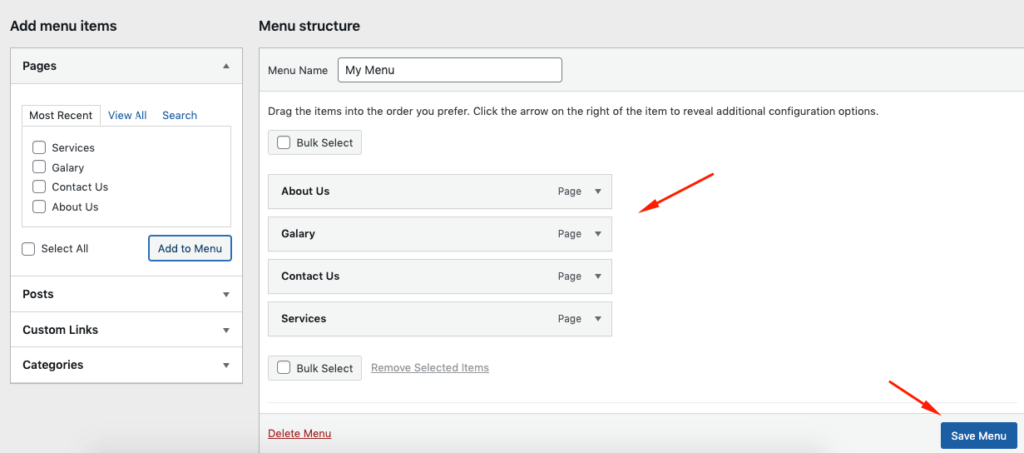
After adding all the pages, you need to create the navigation menu. Go to Appearance→Create a Menu→ Save Menu.
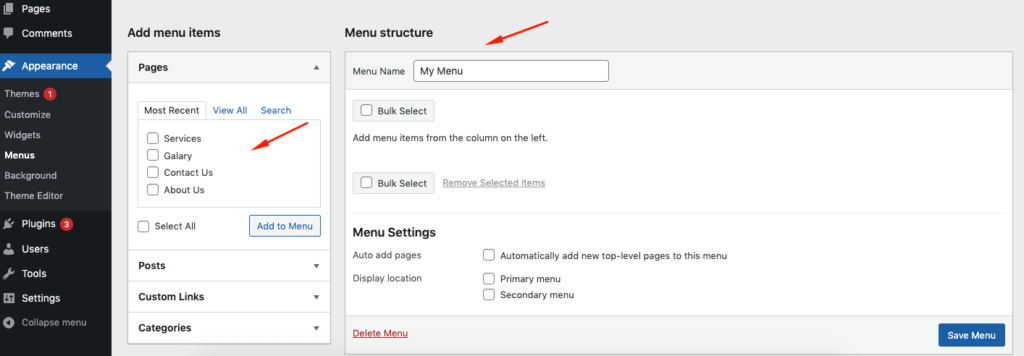
Select the pages you want to add to the menu. The pages will be added to the menu. Hit the Save Menu button to finish.
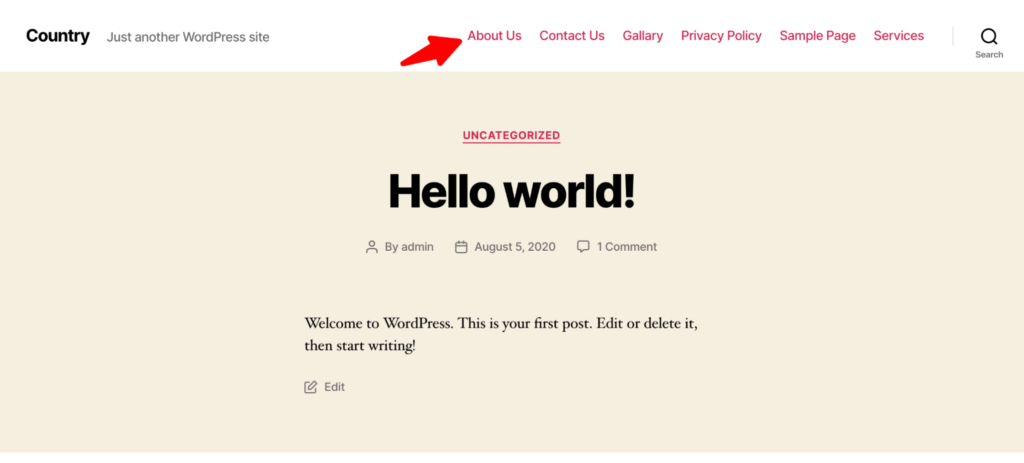
Here’s the frontend view of the created page. As you can see all the web pages are appearing here, including the About Us/Me page.
Step 6: Configure Permalink Structure
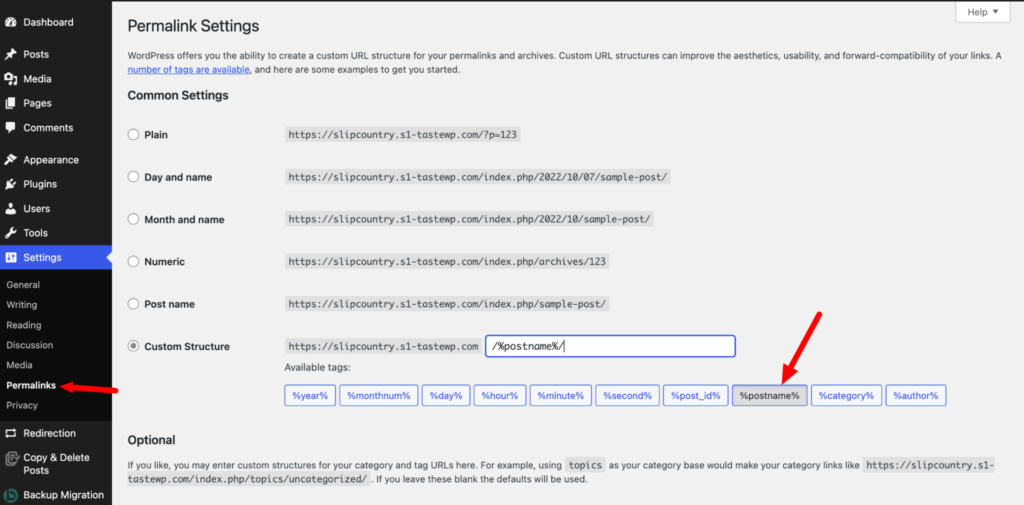
Permalinks are an important part of your website building. It plays an important part in the SEO ranking factor. Because an unstructured URL may harm your website and prevent your site from indexing by search engines.
WordPress gives you the opportunity to manually customize the site’s permalink efficiently. For instance, you need to click on the Permalink option. And then select a custom URL structure. For example, Yoursite/%postname%/-
Step 7: Create a Sitemap and Submit it to Google Search Console (including other search engines as well)
Usually, plugins like RankMath and Yoast SEO create sitemaps automatically for your WordPress site. But there are manual ways to create sitemaps as well.
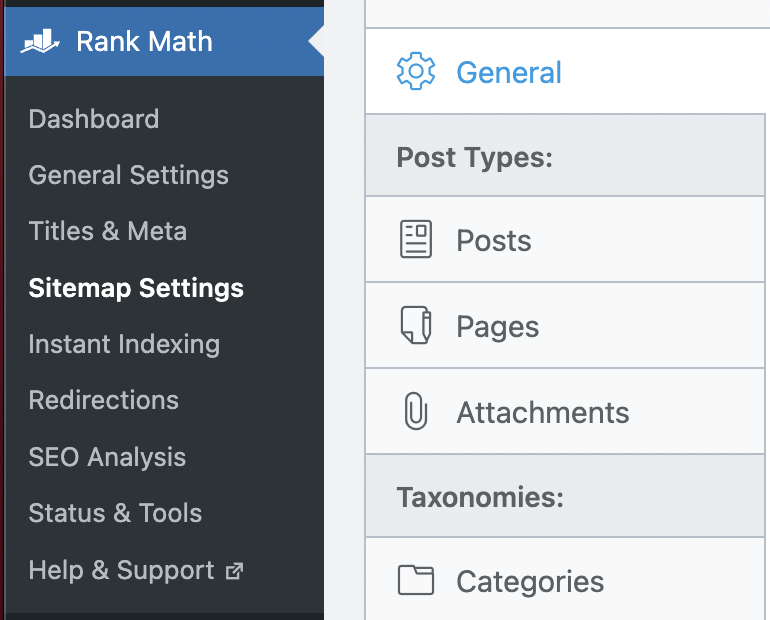
You can use tools like XML Sitemap to create a sitemap and submit it to the Google search console.
Step 8: Publish Your First Content
You are almost there. Now it is time to publish your first content. In order to publish content, go to All Posts→ Add New.
Now, you need to add the post title, content body, and images.
At the right bottom portion, you will find some important elements like post permalink, category, tag, feature image, and discussion. Check the configure them after writing your post.
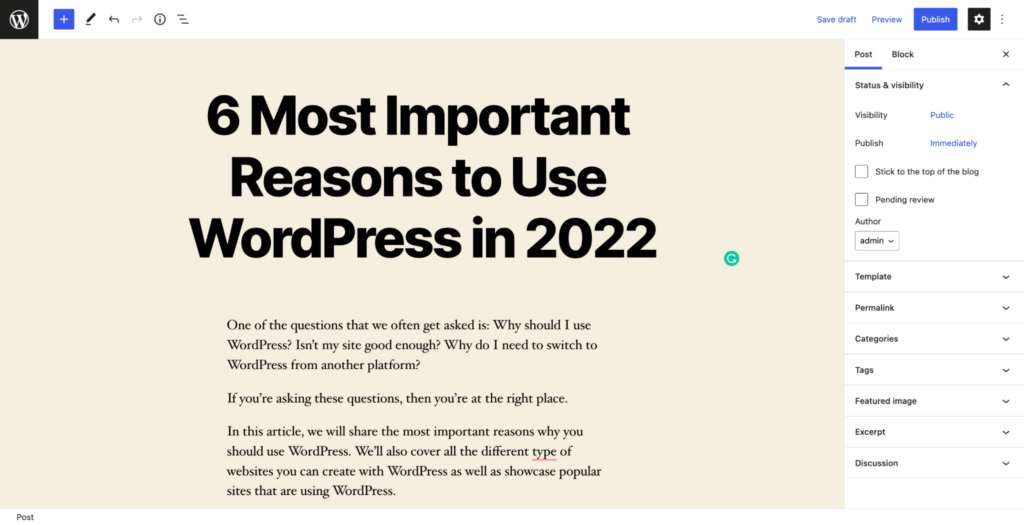
After adding these elements, your post will be ready to publish. Lastly hit the Publish button on the top right-hand corner and your first content is live.
Congratulations. You have created a WordPress site from scratch.
Bonus Part 1: How to Install a WordPress Plugin
WordPress repository has a collection of over 60000+ plugins. There is a famous saying in WordPress “There is a plugin for everything”. That means you can find a plugin that will help you add a different kind of feature to your WordPress site.
“A plugin is a piece of software that plugs into your WordPress site to add or extends its functionalities.”
So in order to add advanced features to your WordPress site, you need to install plugins. You can either download the plugin from WordPree.org or install the plugin from the WordPress dashboard.
To install the plugin from WordPress dashboard, go to Plugins→ Add New.
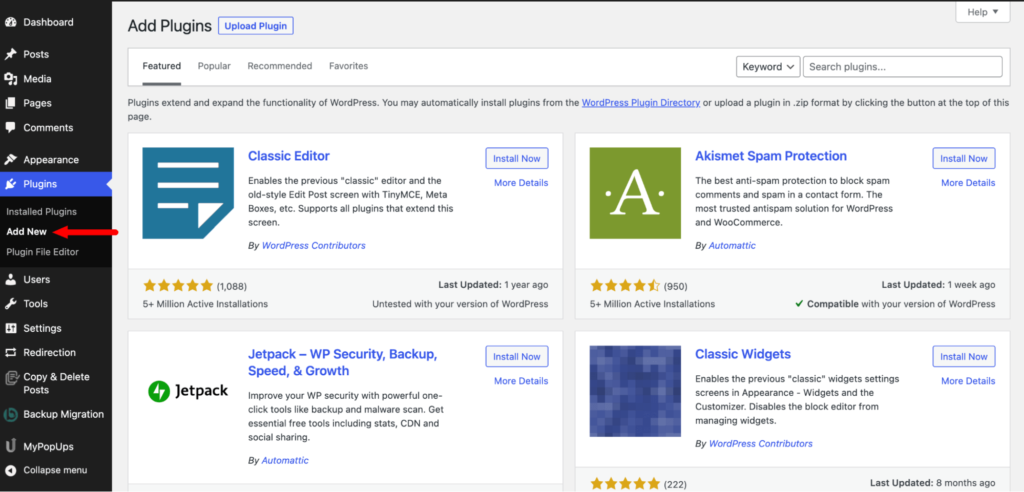
Now, you can type the plugin name in the search box.
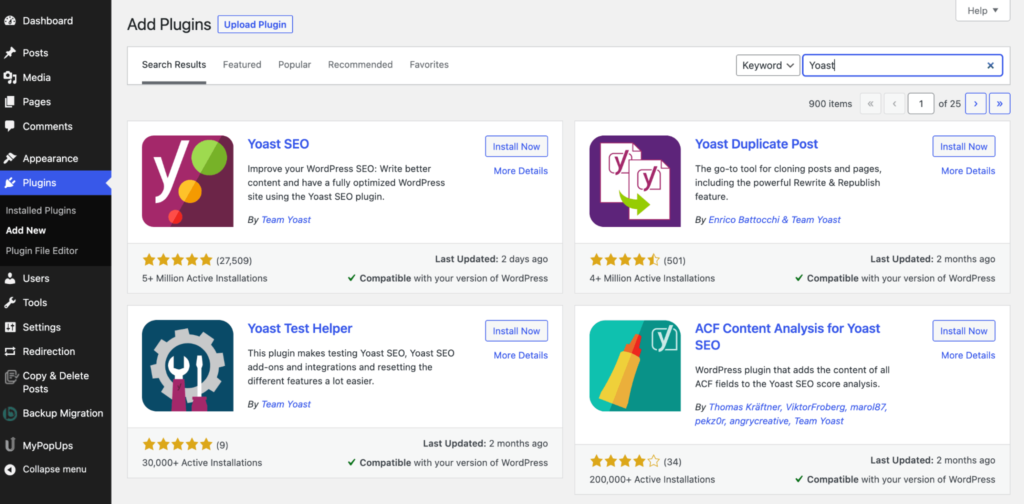
Locate the plugin, install and activate it.
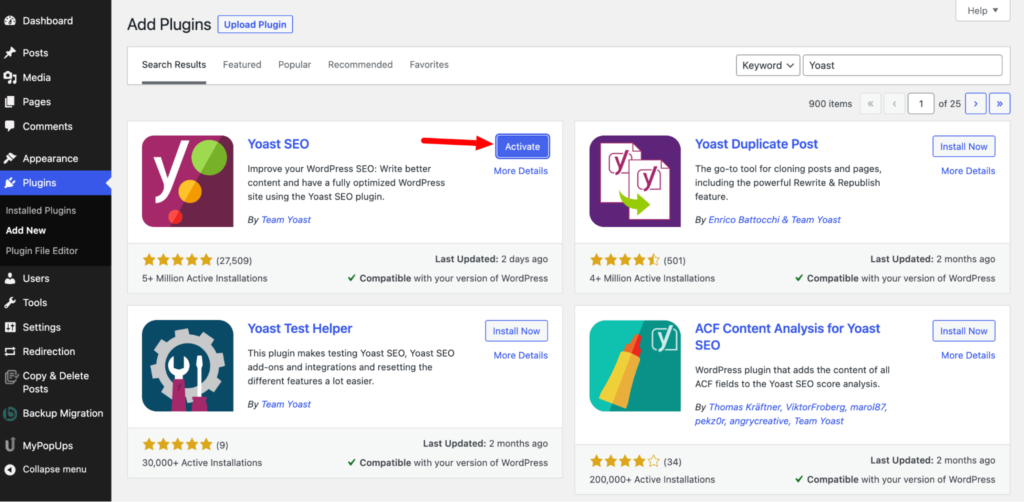
This is how you can install a plugin on your WordPress site with ease. It’s default and best to install free plugins available on the WordPress repository.
But if you want you can manually upload a plugin by going to Plugins→ Upload a Plugin. There you have to upload a zip version of your plugin to install the plugin manually.
Usually Paid plugins are installed this way.
Bonus Part 2: How to Install a WordPress Theme
WordPress offers varieties of themes that you can use to customize and design your WordPress site. And most of the themes are flexible, you can easily customize them as per your requirements.
There are both free and paid themes available on the WordPress repository.
Just like WordPress plugins, you can install a theme from the WordPress dashboard. Just go to Appearance→Theme→ Add New.
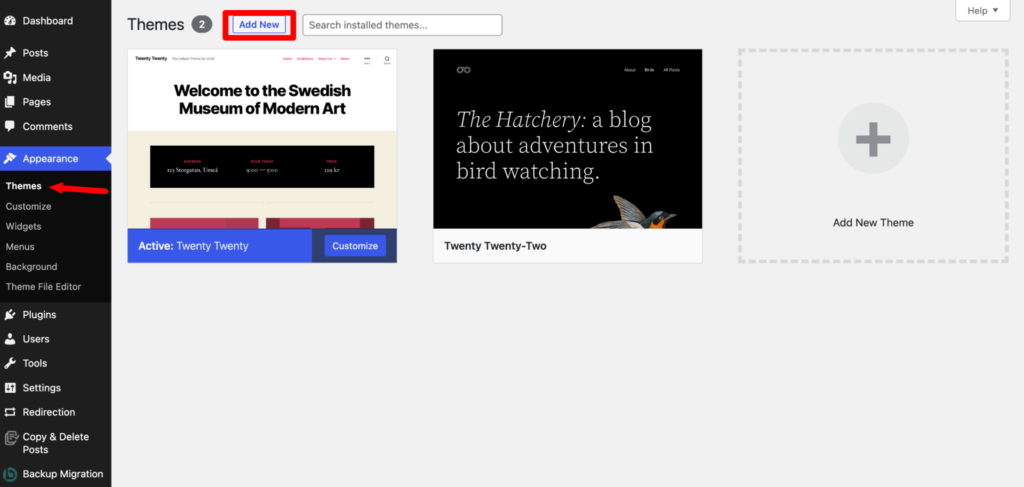
If you know about any theme then you can search for them in the search box or you can filter themes based on different categories.
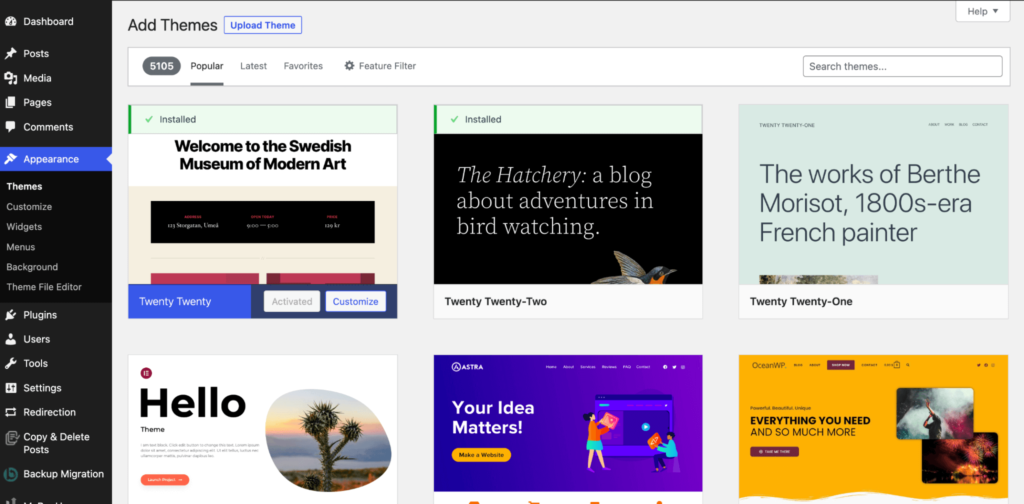
After installing the theme, you can customize it by clicking on the Customize link under the Appearance menu.
This will launch the theme customizer where you will be able to change your theme settings with a live preview of your website.
However, if you are using Full-Site editing themes, then you will see a different customizer.
if you want you can manually upload a theme by going to Theme→ Upload a Theme. There you have to upload a zip version of your theme to install the theme manually.
This is how you can install a theme on your WordPress website.
Check our list of powerful yet popular WordPress themes and things you should consider while adding a theme to WordPress-
FAQ(s) on How to Start a Self-Hosted WordPress Website from Scratch
Yes. You can manually set up a local environment and install WordPress and use it. For that, you need to take help from MAMP, WAMP, or LAMP. This software help users run WordPress site and set up a local environment.
To update the WordPress version, you just need to follow some steps. Navigate to WordPress> Dashboard> Updates And check the updates if available> Continue your update procedure.
No. you don’t need to know HTML or other programming languages to code a website. It will be helpful to learn them in the future, but you don’t need them to make a website using WordPress as a beginner.
WordPress’s basic version comes with a free plan that allows you to build your website without hosting. It gives you the option of creating a website for your brand without paying for hosting. You can even set up your website without a domain name on WordPress.
Wrapping Up on Creating WordPress Sites
That is all you need to know to create a WordPress site from scratch- buying a domain name and hosting plan, installing WordPress and other customization to give your site a professional look.
Having a website is important. Because it helps connect with your audience and collect leads. Creating a website is easy with CMS like WordPress, but obviously it’s a challenging journey for beginners.
If you follow our guide to the letter, then realizing your dream is not far away. Happy online journey!
